How To Build A Concrete Swimming Pool
Dig hole. Fill with the right amount of rebar, plumbing, and electrical stuff to make it work. Spray on the concrete, (shotcrete). Finish with some tile and coping treatments, (the edges of the pool) plaster and it’s basically done. Sounds simple right? Maybe that’s why we’ve all heard about bad pool contractors. These guys thought building pools was simple, easy and had minimal risk with maximum profit.
Well I’ve been around pool builders for years. I’ve met some I liked and some not so much. But what I did learn was that building a quality pool isn’t so easy. Ya, there needs to be a hole. But how big? Deep? Long and wide? Then how to dig the hole? And how do you get the dirt out of the yard and where do you take it? What if you find a giant boulder where you want to put the pool? Plus you can’t break any gas, electrical, water, or septic lines or knock down any fences or parts of the client’s house while you’re working either. As you can see there are lot’s of things to think about with just this one part of building a concrete pool.
HOMEOWNER BUILDER: If you are reading this and are thinking about being the General Contractor on your own pool build you are called a “Homeowner Builder”. I’ve worked with a number of folks over the years who have taken this approach and most have told me it was worth it. They did save money and/or get more upgrades, (water features, spa jets for example) compared to what a basic pool would have cost from a pool builder. However most have also told me it was a lot more stressful than they had expected. In this scenario you are going to be hiring sub-contractors to build your pool. The trick is finding good ones who will treat you well. Not always easy…. We continue…
THE PLAN: But before you start digging you need to know the answers to all the questions above so you can get a pool building permit. This means you need a plan. One that defines your pool along with possible engineering details that come from a qualified pool engineer. These shows how much and where the structural rebar needs to go which will be checked by the pool building inspector during different phases of the build, (are things being constructed up to code?) The location of the pool needs to be in accord with property setbacks, (minimum distances from property lines). This sometimes requires getting a copy of the client’s, (or your own) “Plot Plan” from the county or city where the property is located. To start figuring this out though I’ve seen people use garden hoses simply laid on the ground to establish the “footprint” of their pool.
THE PLUMBING: The pool will also be needing plumbing to work properly for the water to stay clean and usable. Pipes to draw water out, (returns) of the pool and pipes to send it back in. And these pipes need to be designed and arranged in such a way as to be able to create proper water flow and movement such that the chemical treatments to maintain water clarity and sanitation can occur. This includes running the water through skimmers and filters as well as any water features that my be included. The pipe out must, for example, have two pipe access “suction returns” that are a minimum of 3’ apart so that someone could not get trapped and held to the bottom or side of the pool and suffer drowning due to water being drawn out of the pool from a single pipe return and suctioning them down, (and yes there have been multiple drownings due to this unsafe design). And then how may skimmers do you need?, (skimmers draw in the floating debris, leaves etc. from the surface of the water). And where should they go? Put a skimmer in the wrong place that doesn’t take advantage of the prevailing winds and breezes and they won’t work as effectively. Essentially the plumbing needs to match the size and design of the specific pool you are building.
THE HOLE: Back to the hole. Pool builders usually dig out the pool with a backhoe, excavator, or bobcat. And before anyone digs it’s important to contact a “CALL BEFORE YOU DIG” service so that any and all power, gas, and water lines are located. Once the pool is dug, and sometimes in concert with the dig, the plumbing trenches need to be dug. So where the equipment is going to be positioned must also be determined so the trench to that location could be taken care of around this time.
REBAR, REBAR!
All concrete pools have steel rebar in them. The steel adds tensil strength to the structural concrete. That is it helps the pool structure to resist expansion and contraction forces due to the outward weight and pressure of the water and the inward forces of the dirt and soil around the pool. Temperature also impacts the pool structure or “hull” due to the hot/cold cycles in the weather. Without the rebar the pool would crack. The rebar is installed in a criss/cross checker board pattern with the exact locations and sizes of the steel being defined by the engineering details. And usually the rebar is completed first then the plumbing comes in. In addition to the plumbing all the electrical must be installed which is usually just one or two pool light placements. But it can also be multiple smaller lights all around the pool, (LED lights being what I’ve seen in this regard).
SHOTCRETE
Now the big day comes when you are shooting the pool. It’s called shooting because the concrete material is blow on with a high power compressor. It comes in basically two forms.
1 - Shotcrete, (a wet product mixed and produced at a concrete plant that is delivered to the jobsite ready to go in a concrete truck and is already beginning the curing process) and
2 - Gunite, (a dry product that is mixed on site by a portable concrete factory truck. The operator mixes the portland cement, sand, and aggregate, (small gravel) which is pumped out with a powerful compressor to the end of the hose where water is then added as it leaves the nozzle). Gunite can work well but must be provided by an expert operator who is able to keep the ratios of cement to sand etc. correct otherwise the strength of the gunite can be compromised. There is also usually much more “rebound”, (extra unusable concrete) with gunite. With shotcrete the material is almost always consistent coming from a cement plant wet. Order 2500 psi mud and you almost always get 2500 psi mud… I’ve worked with both and prefer shotcrete. The downside to shotcrete is it must get used, carved and placed before it gets hard, (“goes off”) with retardants needed during the hot summer months to slow the cure time..
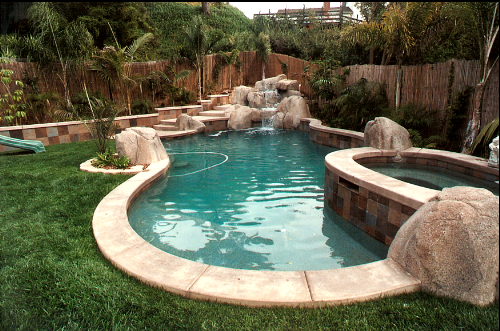
WATER FEATURES, (stuff I do!)
Now that the basic pool has been established, (and sometimes before) any and all water features that are not part of the pool structure can be added. Rebar can get epoxied into the pool walls, bent and shaped, and plumbed etc. and shotcreted as well. After that waterproofing, texture coats, painting and the finish.

TILE & COPING
Tile and coping speaks to how the perimeter of the pool gets finished. The tile generally goes around the pool at and above the water level in the case of a “raised bond”, (where the pool side rises when there’s a raised deck or spa connected to the pool for example). The tiles is used because it is a fired or glazed product more resistant to chemical and water penetration thus reducing the problem of efflorescence or calcification, (the white chalking mineral deposits due to hard water). They can come in many different colors, styles and sizes as well as actual glass. To install the tiles the surface usually must be flat and perfectly vertical. A specially designed pool “mastic” is used to attach the tile after which the joints, (space between the tiles) gets grouted with a fine grit mortar mix. A sponge is used to clean off the tiles after the grout begins to harden…

The coping or portion of the perimeter of the pool that is above the tile is the “coping”. This can be covered with flat rock pieces call flagstone, precast stone or bricks, or poured in place concrete. One way or another a flat solid end product must result. With all approaches being totally effective when done right.
PLASTER
When the tile and coping is finished along with any water features the pool is ready for it’s plaster. This is cementatios product that is manufactured at the jobsite with a Plastering truck that, once mixed, gets pumped through a hose and sprayed on the pool surface. There are different types of plaster some stronger and longer lasting than others. Regular plaster is the least expensive with Pebble Tec, Gemstone and the like being a product that has tiny pebbles being set into the plaster “matrix” giving it a more durable long lasting finish. It’s also the more expensive approach…
NOW WHAT?
Once the plaster has been installed the rest of the pool area must get finished. That includes decks, arbors, patio covers, BBQ’s plantings and the like. The pool also needs to be ‘“started up'“ called…surprise! “The Start-Up”. Water hoses go in and the water chemistry process begins where the optimum balance of chlorine and other chemicals are added. After a set time the pool is then ready to be used!
GETTING WET!
So there you have it The basics on how to build a concrete pool. To continue your research just Google the various aspects I’ve mentioned as well as DIY Pools and you’ll be discovering endless amounts of information that will arm you with all you need to know to either being a homeowner builder or a much more educated customer for a pool contractor.
Pools are an awesome addition to any home. I recall spending hours and hours playing in our families pool growing up. They’re also a hazard too so it’s really important that you abide by all building codes, gate and fencing codes…. Nothing worse than a happy thing turning into an unhappy thing... That said let the splashing and laughter begin!
- Dave
PS: For free info on how to build faux rock waterfalls etc., including my new books “Makin’ Rocks” & “All About Concrete Slides!”, please follow the links or go to www.davehenderson.podia.com Thank you! :)